The reasons for tension and pain in neck and shoulders are manifold: Whether you’re stressed, you were too ambitions in your last workout, or you just slept funny. However, the main culprit is our modern lifestyle: We all spend far too much time sitting nowadays.
The human body wasn’t made for sitting for 8-10 hours every day. What usually happens when you spend too much time sitting is that the muscles in the front body shorten and those in the back body become weak. Yoga can help you to lengthen the front body and tone the back body so that you can find a more upright posture.
In this article, you will learn:

Stress is one of the most common reasons for visits to the doctor. Photograph by Mitchell Hollander on Unsplash.
1. Why We Get Neck and Shoulder Pain
The neck and shoulders are a main area to accumulate stress. In particular the neck muscles react very sensitively to stress. Needless to say that this is even further aggravated by spending all day hunched over the desk, mobile phone, or in the car. Many people have the tendency to react to stressful situations by tightening the muscles in the neck and shoulders, which can cause pain in these areas in the long term.
In most cases, tight shoulders are the result of tight trapezius muscles. The trapezius runs from the back of the head to the lower thoracic spine and also attaches to the shoulder blade. It supports the weight of the arm and effects retraction, rotation and depression of the scapula.
Feeling tight in the upper back is usually caused by tension in the space between the shoulder blades, i.e. the rhomboids. This is often due to slouching or dropping the shoulders forward while working at the desk or staring at our mobile phones.
This also causes tightness in the chest and front body, namely the pectoralis minor muscle. Maintaining flexibility in this muscle can prevent the shoulders from being constantly pulled forward .
You may wonder why tight chest muscles, pulling the shoulders down, cause pain in the neck and shoulders, i.e. the back area. This is because constantly pulling the shoulders overstretches the rhomboids since they mainly try to pull the shoulder blades back into proper alignment.
In addition, tight chest muscles also cause tension in the levator scapulae, a muscle situated at the back and side of the neck which is responsible for lifting the shoulder blades (as its name suggests).
This is why you don’t only need to stretch and open the front body, but also need to work on strengthening the back muscles to release tension and ease neck and shoulder pain.

Neck and shoulder pain is often due to tight trapezius muscles. Photograph by Jesper Aggergaard on Unsplash.
2. How Yoga Can Help to Ease Neck And Shoulder Pain
Studies have shown that yoga can be an effective means to ease neck and shoulder pain. In a randomized controlled trial on the effects of a 9-week yoga program on chronic upper back pain, the test participiants experienced significant pain relief and functional improvements. This suggests that yoga might be a useful treatment to ease tension in neck and shoulders.
Yoga provides a balanced approach to mobilization, strength and surrender around the upper back, neck and shoulders. It can have great therapeutic effects for neck and shoulder tension when practiced with great sensitivity. It’s also a good idea to consider a regular yoga practice as general maintenance for the upper back and shoulders in order to prevent injuries and stay healthy and open for all of life’s other activities.
That’s why we have several programs on TINT that can help you or your students to ease neck and shoulder pain such as Mirjam Wagner and David Lurey‘s yoga therapy program focussing on the shoulders and upper spine. Or try Young Ho Kim’s Healthy Neck program, where he practices together with Eva Padberg (German only) with yoga poses specifically aimed at the upper back to soothe pain the neck and shoulder area.
Especially long journeys and business trips can put stress and strain on body and mind, resulting in plaguing neck and shoulder pain. Try Yoga for Travel to invest in your health even when you’re on the go.
Invest in yourself even when your on the go with Yoga for Travel on TINT.
Another great tool you can use on the go is our free collection of yoga class plans, which provides detailed descriptions of different yoga class themes that are suitable for various level. You’ll find, for example, yoga for beginners, an evening yoga practice, or a morning yoga sequence. You can use this ebook for your own practice or if you need inspiration for your teaching.
3. 6 Yoga Poses to Open the Front Body
Opening up the front body can help to improve posture and therefore ease neck and shoulder pain. That’s why a yoga practice for the upper back should always also include front-opening exercises.
To prepare the body and the mind for the practice ahead, start in an upright seat and press the hips back a little to create a slight concave curve in the lower back and straighten the spine. Place the hands on the thighs with the palms facing upwards. Press the chest right up and pull the elbows in towards the body. Lift the chin slightly and create space and a feeling of lightness in the chest to let the breath flow slowly and steadily.
3.1. Lizard
Start in a table-top position and step the right foot up to the outside of the right hand. Move the left knee a bit further back. Release the toes and gently pull the left knee toward the center of the body. Let the pelvis sink towards the ground and, on the exhale, let the chest melt down toward the yoga mat. Repeat this up and down movement for a few breaths, allowing the breath to flow naturally and keeping the chest light.

Lift and lower the chest in Lizard pose.
Now place the forearms on the ground and open the right foot 45 degrees to the right and let the knee drop outward so that the pelvis can sink even further down. Let the pelvis get heavy and, at the same time, imagine you’re moving into a backbend. Maintain this pose for a few steady breaths and, on an exhale, slowly come out of the pose and repeat the same Lizard variations on the opposite side.

Place the forearms on the ground in Lizard pose.
3.2. Low Lunge with Side Bend
Start in Downward-Facing Dog. Lift the right leg up and step the right foot forward between the hands. Place the left knee on the ground and rise up into a Low Lunge. Place the left hand onto the back of the head, pull the elbow in and then lean into a side bend to the right. Place the right hand to the ground further out to the right and slightly back. Go into a backbend and lift the left knee off the ground.
Transition back into Downward-Facing Dog after a few breaths and repeat this Low Lunge variation on the opposite side.
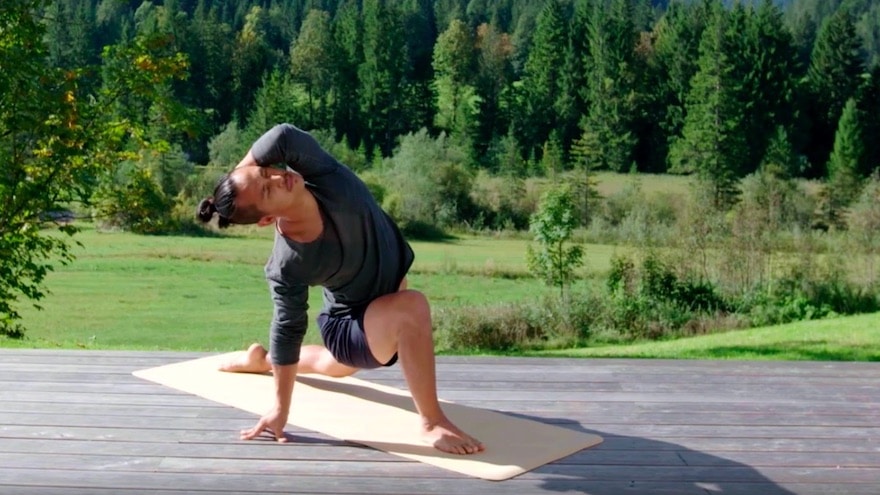
Combine Low Lunge with a side bend.
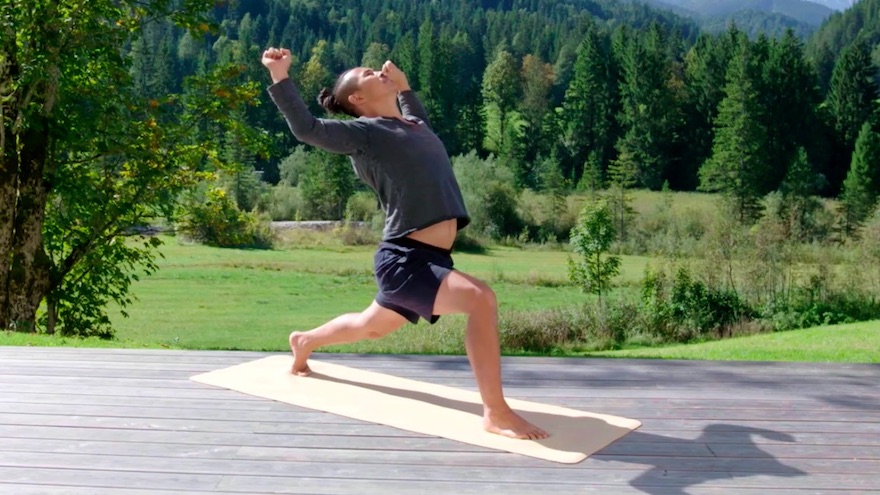
3.3. High Lunge with Backbend
The starting point is Downward-Facing Dog again. Take a big step back with the right foot and lift the left arm up. Lift your pelvis slightly and press the left hand against the back of your head, draw the elbow in and press your head back into your hand. Lean back and maintain a steady breath.
Slowly release after a few breaths and step the right foot forward to repeat the pose on the opposite side.

Release tension in neck and shoulders with this High Lunge variation.
3.4. Puppy Stretch
After a few breaths in the High Lunge variation, slowly come out of the pose and take the right foot back into Downward-Facing Dog. Come onto your fingertips with both hands far out to the front and a little wider than your shoulders. Place the knees on the ground and send your sitting bones back and up. At the same time, let your chest melt toward the ground and create length in the side body. Move the pelvis further back and lift your armpit up but let the chest sink down.
Maintain this pose for a few breaths before releasing it and coming into a table-top position.

Release tension in neck and shoulders with this Puppy Stretch.
3.5. Low Lunge with Arms Extended
From table-top position, step your right foot forward and move the left knee back. Release the toes and lift the torso up into a Low Lunge. Pull the left hip toward the right knee and push your right shin forward while, at the same time, pulling the right sitting bone down toward the heel.
Pull the pubic bone up and lean back. Pull the shoulders up and then back towards the spine. Lift your chin to let the neck grow long. Lift up both arms and hook the thumbs together. Straighten the arms and slowly lean your head back against your arms and breathe.
Maintain this pose for a few breaths before slowly releasing it on an exhale. Transition into Downward-Facing Dog and step the left foot forward to repeat this Low Lunge variation on the opposite side.

Extend the arms and lean back in Low Lunge.
3.6. Pigeon with Twist
From Downward-Facing Dog, lift the right leg up and pull the right knee up towards the hands for Pigeon pose. Alternatively, you can bring the right foot to the outside of your right hand and place the left knee onto the ground.
Place the forearm on the ground and take hold of the right ankle with the left hand and twist to the right, opening the chest. Bend your left knee and reach for the left foot with the right hand. Pull the heel toward the buttocks, lean back and rotate the chest to the right, maybe even coming into a gentle backbend.
Release after a few breaths and return to Downward-Facing Dog before you repeat this pose on the opposite side.
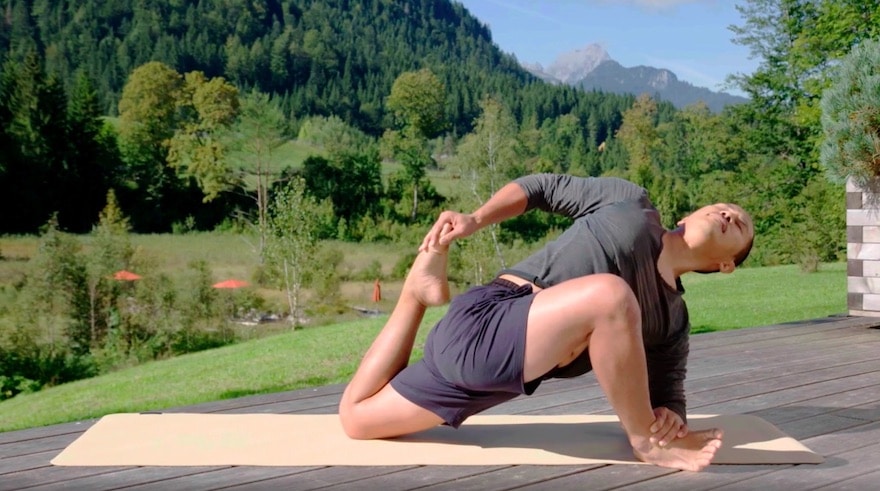

Twist in either Low Lunge (right) or Pigeon pose (left).
If you’re looking for more guidance on your yoga practice, we’ve created something special for you: a free eBook that contains yoga class plans ready to use for your classes. The eBook offers different classes for different levels, where you can find the asanas along with their descriptions in a logical order.
4. 6 Yoga Poses to Strengthen the Back Muscles
The second important part of a yoga practice for neck and shoulders is the strengthening of the upper back muscles. Before starting to practice these poses, start in an upright seat, either cross-legged or on the heels. Open the arms to the sides with a 90-degree bent at the elbow. Draw the elbows forward and the hands back.
Imagine you’re doing a pull-up: Pull down the elbows slightly and use this movement to draw the chest forward and up. This will engage your back muscles and you’ll need this pull-up position in some of the upcoming poses.

Imagine you’re doing a pull-up with your arms to engage the back muscles.
4.1. Seated Twist
In your seated position, release the arms and bring the left hand on the outer side of the right thigh. Use your hand to rotate your chest to the right and also twist your belly button to the right.
Lift your right arm and bend it at a 90-degree angle. Pull with your left hand on your right thigh to deepen the twist. At the same time, pull the right elbow slightly down and lift the chest up. Release the pose after a few breaths and switch sides.

Target the back muscles in a seated twist.
4.2. Warrior 1
Start in Downward-Facing Dog and step the right foot forward between the hands. Lift the torso up and the back heel away from the ground to come into Warrior 1. Slightly bend the back knee and pull the pubic bone up before you straighten the leg again. Pull both legs toward each other and let the pelvis sink down while the chest lifts.
Bring both arms out to the sides and bend them at 90-degrees. Pull both elbows down while lifting the chest forward and up. Continue to breathe steadily as you maintain this pose.
Engage the back muscles in Warrior 1.
On an inhale, step the left foot forward to meet the right one and bow down into a Forward Fold. Bend your knees slightly to tilt your pelvis. Lift the sitting bones up and let the chest sink down toward the ground.
Place both hands onto the back of your head and press your head against your hands to create resistance. This will engage the muscles in the upper back. Keep the knees bent and lift the elbows. Open your chest and lift your chin. Maintain this engagement of the upper back muscles and slowly rise up into a standing position.
Bend your knees and lift the arms to the sides, again at a 90-degree angle to come into this pull-up position. To increase the intensity in this pose, lift both heels up. Bow down into a Forward Fold on an exhale. Take big step back with the right foot and repeat Warrior 1 with the arms at a 90-degree angle with the left leg in front.

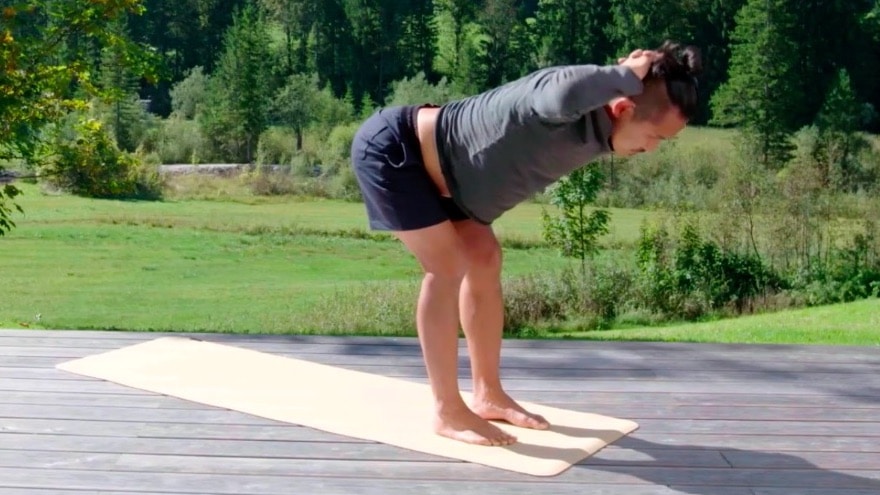

1. Fold forward. 2. Engage the back muscles and lift up. 3. Take a slight back bend.
Return to a Forward Fold at the front of the mat after a few breaths. Place the hands against the back of the head again and create resistance to engage the upper back muscles. Lift the torso up to come into a standing position.
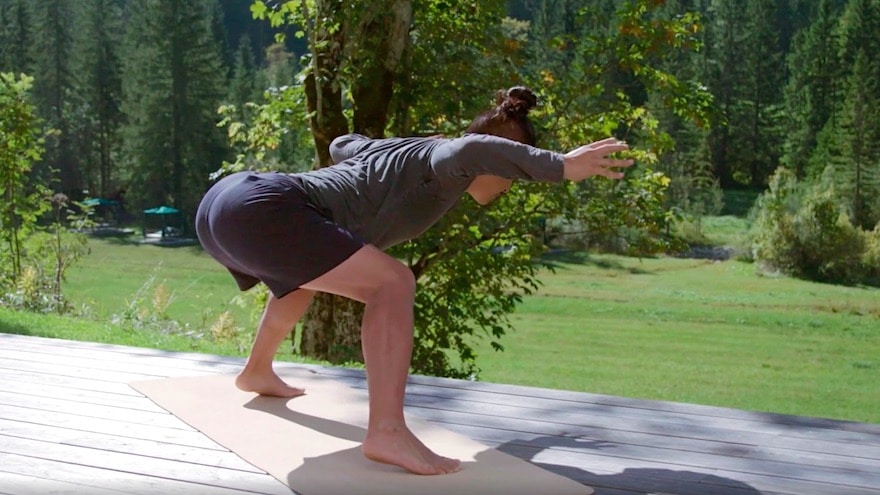
4.3. Standing Twist
Start in a neutral standing position, bend the knees and lift the right knee. Take hold of the right thigh with the left hand. Move the hips back and stick the butt out. Turn the chest further toward the right and lift the right arm with the elbow bent at 90 degrees again.
Pull the right knee closer in toward the body while, at the same time, pulling the right elbow down to move into a slight backbend. Maintain this pose for a few steady breaths before you return to center and repeat the pose on the left side.

Strengthen the back muscles with this twist variation.
4.4. Wide-Legged Stance
Start in a neutral standing position again and step the left foot back. Turn toward the left and place both feet parallel to each other to come into a wide-legged stance.
Bend the knees and push the hips back. Lift the heels off the yoga mat and lift the head slightly to open the chest. Once you’ve found your balance in this position, lift both arms up to the sides with the elbows bent at 90 degrees.
After a few breaths in this position, bend forward into a Wide-Legged Forward Fold. Maybe, you can even place the forearms onto the ground. Send the hips back and up. Use your arms to push them even further up and away.

Balance on the balls of the feet before bowing down into a Wide-Legged Forward Fold.
4.5. One-Legged Seated Staff Pose
Start in a seated position. Bring the legs to the front to sit in Staff Pose. Bend the right knee and open it out to the side, placing the sole of the foot against the left thigh so that your legs form a 90 degree angle. The chest is at the center between your legs.
Hold onto both knees with your hands and pull on them to open the chest. Bring the hands together in front of your chest with the thumbs facing the sternum. Lift the chest and reach the arms up.
Feel the engagement of your upper back muscles and even come into a gentle backbend here as well. Press the left leg down into the yoga mat. At the same time, lift the chest higher and look toward your thumbs.
Note that it’s okay if the shoulders lift up slightly in this position. Press the palms together. Maintain this pose for some time even though (or especially because) it may feel really intense.
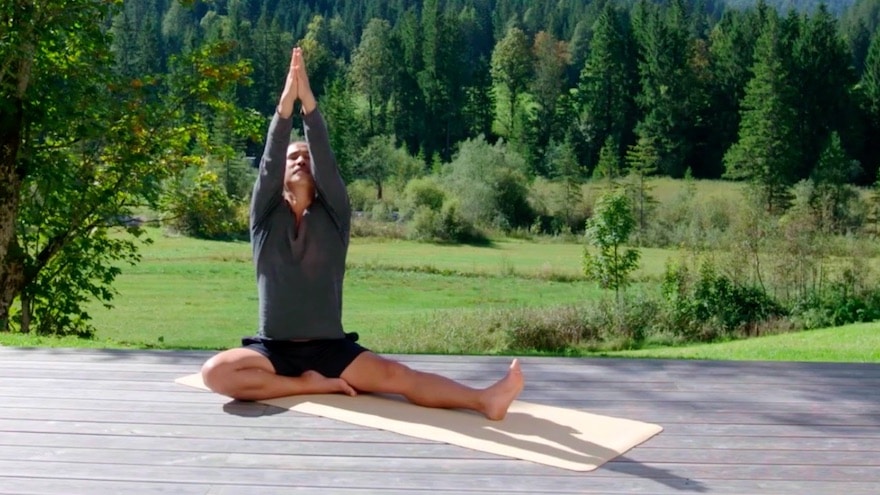
Maintains this pose for a few breaths, even though it’s very intense.
Release the arms and turn your chest so that you can fold over your left leg. With the right hand, take hold of the outer side of the left foot and, if this is available to you, reach the left arm under your right armpit onto your right knee. Release the head down. Stay here for a few breaths before you change sides.
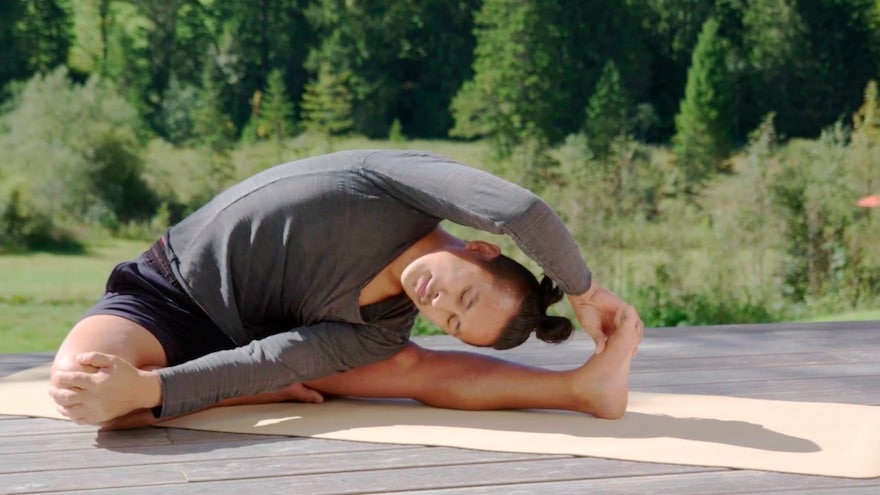
Fold forward in one-legged staff pose.
4.6. Supine Backbend
Lie down onto your back with the feet on the ground. The pelvis stays grounded but allow the lower back to move into a slight concave curve.
Bring the elbows close to the body and bend the arms at a 90 degree angle again. Press the elbows down into the yoga mat while you spread the fingers. Press the elbows further into the ground to lift up the chest. It’s okay if the shoulders also lift a little bit. Lift the chin and press the back of the head into the yoga mat. Activate the entire back body and hold for a few breaths.
This is the perfect pose to directly transition into Savasana to complete your yoga for neck and shoulders.

Activate the entire back body in this supine position.
5. Watch the Video: Yoga for Neck and Shoulders with Young Ho Kim
If you’re now eager to practice these yoga poses to ease neck and shoulder pain yourself, roll out your yoga mat and directly practice with Young Ho Kim in his Yoga for Neck and Shoulders on TINT.
This program will teach you techniques to soothe tension and pain in the neck and shoulders and is made for everyone – from beginners to advanced practitioners. It can even be a source of inspiration if you’re a yoga teacher and your students regularly ask for yoga poses to release tension in these areas.
Practice Yoga for Neck and Shoulders with Young Ho Kim on TINT.
If you’re looking for more features to make your yoga practice or yoga teaching easier, have a look at our free collection of Yoga Class Plans, which provides free sample yoga class plans for various different class types and levels. Each class contains a sequence of asanas along with their description and is a great tool if preparation time is short and you just want to roll out your mat or start teaching.